> ## Documentation Index
> Fetch the complete documentation index at: https://docs-staging-chore-gt-workflow.mintlify.site/llms.txt
> Use this file to discover all available pages before exploring further.

> Découvrez comment stocker les identifiants d’intégration de Flows dans le Vault afin d’y faire référence lors de l’exécution de Forms.

# Vaults

Le Vault vous permet de stocker en toute sécurité des secrets ou des paramètres courants (par exemple : des clés API, des <Tooltip tip="Jeton d’accès : identifiant d’autorisation, sous la forme d’une chaîne opaque ou d’un JWT, utilisée pour accéder à une API." cta="Voir le glossaire" href="/docs/fr-ca/glossary?term=access+tokens">jetons d’accès</Tooltip>, des <Tooltip tip="Jeton d’accès : identifiant d’autorisation, sous la forme d’une chaîne opaque ou d’un JWT, utilisée pour accéder à une API." cta="Voir le glossaire" href="/docs/fr-ca/glossary?term=refresh+tokens">jetons d’actualisation</Tooltip>) pour authentifier les requêtes auprès de services externes ou d’intégrations, sous forme de connexions Vault.

<Callout icon="file-lines" color="#0EA5E9" iconType="regular">
  * Certaines connexions exigent que l’utilisateur fournisse des identifiants (par exemple, avec une application Auth0 machine-to-machine (M2M), vous générez un jeton d’accès avec une durée d’expiration et un jeton d’actualisation). La connexion stocke les deux jetons et génère un nouveau jeton d’accès avant son expiration.
  * Certains services externes exigent que vous autorisiez des scopes pour générer des identifiants d’API. Si vous modifiez les scopes, mettez à jour la connexion à ces services afin d’éviter les problèmes de connexion.
  * Lorsqu’une connexion est ajoutée, elle est prête à être utilisée dans vos flux. Toute mise à jour d’une connexion existante sera automatiquement propagée.
</Callout>

<h2 id="create-and-modify-vault-connections">
  Créer et modifier des connexions Vault
</h2>

Créez et modifiez des connexions Vault depuis la page Vault ou dans l’éditeur de flux lorsqu’une action nécessite des identifiants.

<h3 id="create-vault-connections-from-the-vault-page">
  Créer des connexions Vault depuis la page Vault
</h3>

Ajoutez une connexion Vault depuis la page Vault en suivant ces étapes :

1. Ouvrez l’éditeur de formulaires en sélectionnant **Auth0 Dashboard > Actions > Forms.**
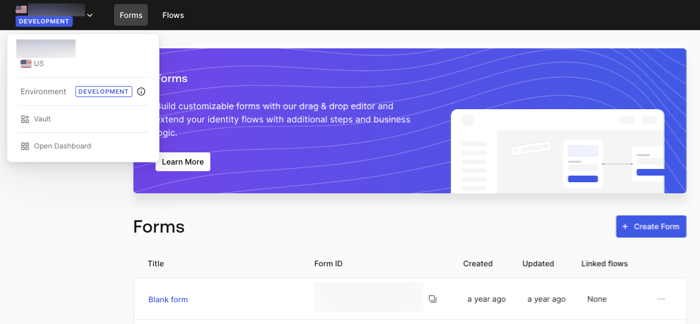
2. Dans le coin supérieur gauche, sélectionnez le menu du tenant, puis **Vault** pour ouvrir la page Vault.
   <Frame>
     <img src="https://mintcdn.com/docs-staging-chore-gt-workflow/ZhLEyvQbzaywB8Vw/docs/images/cdy7uua7fh8z/1sPNPKO6nuEDCuiYGRWSur/d85dc616170eaf2d7d5f321750863ccf/vault-connection.png?fit=max&auto=format&n=ZhLEyvQbzaywB8Vw&q=85&s=29bdc7ef299203e6ac0b0bbaee3c767a" alt="Dashboard > Forms > Vault" data-og-width="700" width="700" data-og-height="324" height="324" data-path="docs/images/cdy7uua7fh8z/1sPNPKO6nuEDCuiYGRWSur/d85dc616170eaf2d7d5f321750863ccf/vault-connection.png" data-optimize="true" data-opv="3" srcset="https://mintcdn.com/docs-staging-chore-gt-workflow/ZhLEyvQbzaywB8Vw/docs/images/cdy7uua7fh8z/1sPNPKO6nuEDCuiYGRWSur/d85dc616170eaf2d7d5f321750863ccf/vault-connection.png?w=280&fit=max&auto=format&n=ZhLEyvQbzaywB8Vw&q=85&s=d1cddc1bdc0d73bb686b80777e4dee31 280w, https://mintcdn.com/docs-staging-chore-gt-workflow/ZhLEyvQbzaywB8Vw/docs/images/cdy7uua7fh8z/1sPNPKO6nuEDCuiYGRWSur/d85dc616170eaf2d7d5f321750863ccf/vault-connection.png?w=560&fit=max&auto=format&n=ZhLEyvQbzaywB8Vw&q=85&s=e74406694ca2373abd826a2551c61f45 560w, https://mintcdn.com/docs-staging-chore-gt-workflow/ZhLEyvQbzaywB8Vw/docs/images/cdy7uua7fh8z/1sPNPKO6nuEDCuiYGRWSur/d85dc616170eaf2d7d5f321750863ccf/vault-connection.png?w=840&fit=max&auto=format&n=ZhLEyvQbzaywB8Vw&q=85&s=4bbc036e32a32b036104d964e1b05378 840w, https://mintcdn.com/docs-staging-chore-gt-workflow/ZhLEyvQbzaywB8Vw/docs/images/cdy7uua7fh8z/1sPNPKO6nuEDCuiYGRWSur/d85dc616170eaf2d7d5f321750863ccf/vault-connection.png?w=1100&fit=max&auto=format&n=ZhLEyvQbzaywB8Vw&q=85&s=b93685d86e923ae257490e67b2fb468d 1100w, https://mintcdn.com/docs-staging-chore-gt-workflow/ZhLEyvQbzaywB8Vw/docs/images/cdy7uua7fh8z/1sPNPKO6nuEDCuiYGRWSur/d85dc616170eaf2d7d5f321750863ccf/vault-connection.png?w=1650&fit=max&auto=format&n=ZhLEyvQbzaywB8Vw&q=85&s=734996e727c759df3302169170cdc233 1650w, https://mintcdn.com/docs-staging-chore-gt-workflow/ZhLEyvQbzaywB8Vw/docs/images/cdy7uua7fh8z/1sPNPKO6nuEDCuiYGRWSur/d85dc616170eaf2d7d5f321750863ccf/vault-connection.png?w=2500&fit=max&auto=format&n=ZhLEyvQbzaywB8Vw&q=85&s=585bd9e2183feff8578dc1f5b36cd0af 2500w" />
   </Frame>
3. Sélectionnez **Add Vault Connection**.
4. Sélectionnez l’action voulue, puis **Continue**.
5. Saisissez un **Connection name** pour la connexion Vault, puis sélectionnez **Continue**.
6. Entrez les identifiants.
   Si vous ne disposez pas des identifiants requises, vous pouvez sélectionner **Create an empty connection** et les ajouter plus tard. Les connexions vides sont signalées par une icône orange indiquant l’absence d’identifiants.
7. Sélectionnez **Add Vault Connection**.

<h3 id="create-vault-connections-from-the-flow-editor">
  Créer des connexions Vault à partir de l’éditeur de flux
</h3>

Ajoutez une connexion Vault à partir d’une action de Flow, par exemple Twilio, en suivant ces étapes :

1. Ouvrez l’éditeur de flux en sélectionnant **Auth0 Dashboard > Actions > Forms > Flows**
2. Sélectionnez un flux et ajoutez une action **Send SMS with Twilio**.
3. Dans le paramètre **Vault connection** de l’action, sélectionnez l’icône **+**.

   <Frame>
     <img src="https://mintcdn.com/docs-staging-chore-gt-workflow/ePJU_QUjO_--zPpq/docs/images/cdy7uua7fh8z/1AsaznhRKxm5LZxPlcbfUw/10e5a8af700aab909f5b03fcd266da7e/twilio-vault-connection.png?fit=max&auto=format&n=ePJU_QUjO_--zPpq&q=85&s=1f3a94e04e26ade7074fe07d6a4c4a5c" alt="Dashboard > Forms > Vault " data-og-width="1104" width="1104" data-og-height="191" height="191" data-path="docs/images/cdy7uua7fh8z/1AsaznhRKxm5LZxPlcbfUw/10e5a8af700aab909f5b03fcd266da7e/twilio-vault-connection.png" data-optimize="true" data-opv="3" srcset="https://mintcdn.com/docs-staging-chore-gt-workflow/ePJU_QUjO_--zPpq/docs/images/cdy7uua7fh8z/1AsaznhRKxm5LZxPlcbfUw/10e5a8af700aab909f5b03fcd266da7e/twilio-vault-connection.png?w=280&fit=max&auto=format&n=ePJU_QUjO_--zPpq&q=85&s=3a21a53447fe26137cab89bbe7f9cfcb 280w, https://mintcdn.com/docs-staging-chore-gt-workflow/ePJU_QUjO_--zPpq/docs/images/cdy7uua7fh8z/1AsaznhRKxm5LZxPlcbfUw/10e5a8af700aab909f5b03fcd266da7e/twilio-vault-connection.png?w=560&fit=max&auto=format&n=ePJU_QUjO_--zPpq&q=85&s=b5a53aafcac3bdd51af7442444c75e31 560w, https://mintcdn.com/docs-staging-chore-gt-workflow/ePJU_QUjO_--zPpq/docs/images/cdy7uua7fh8z/1AsaznhRKxm5LZxPlcbfUw/10e5a8af700aab909f5b03fcd266da7e/twilio-vault-connection.png?w=840&fit=max&auto=format&n=ePJU_QUjO_--zPpq&q=85&s=f51c444435c1107301a243f494004bdc 840w, https://mintcdn.com/docs-staging-chore-gt-workflow/ePJU_QUjO_--zPpq/docs/images/cdy7uua7fh8z/1AsaznhRKxm5LZxPlcbfUw/10e5a8af700aab909f5b03fcd266da7e/twilio-vault-connection.png?w=1100&fit=max&auto=format&n=ePJU_QUjO_--zPpq&q=85&s=e0c79965ccf734f7cb17fccb7e9e3e89 1100w, https://mintcdn.com/docs-staging-chore-gt-workflow/ePJU_QUjO_--zPpq/docs/images/cdy7uua7fh8z/1AsaznhRKxm5LZxPlcbfUw/10e5a8af700aab909f5b03fcd266da7e/twilio-vault-connection.png?w=1650&fit=max&auto=format&n=ePJU_QUjO_--zPpq&q=85&s=3abcc0a2c81c6592888841a7fafc1a02 1650w, https://mintcdn.com/docs-staging-chore-gt-workflow/ePJU_QUjO_--zPpq/docs/images/cdy7uua7fh8z/1AsaznhRKxm5LZxPlcbfUw/10e5a8af700aab909f5b03fcd266da7e/twilio-vault-connection.png?w=2500&fit=max&auto=format&n=ePJU_QUjO_--zPpq&q=85&s=e5c4ab4b4ad561f5a6c2d210d25ef2fe 2500w" />
   </Frame>
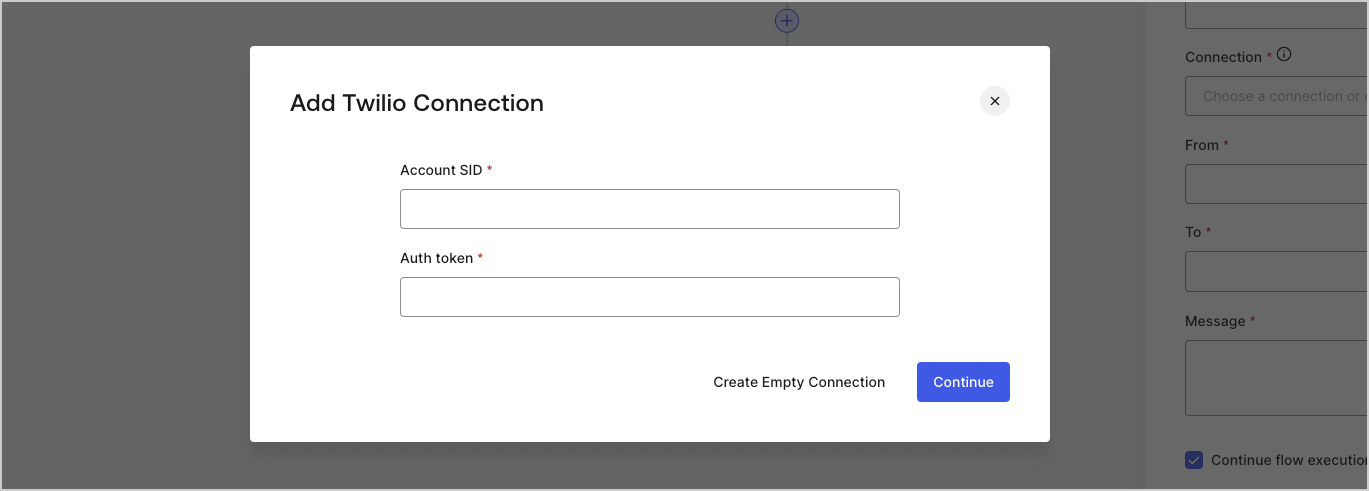
4. Ajoutez un **Connection name** à la connexion Vault et sélectionnez **Continue**.
5. Saisissez les identifiants.
   Si vous n’avez pas les identifiants requis, vous pouvez sélectionner **Create an empty connection** et les ajouter plus tard. Les connexions vides affichent une icône orange indiquant que des identifiants sont manquants.
   <Frame>
     <img src="https://mintcdn.com/docs-staging-chore-gt-workflow/PzoOIgRpU65TZp7z/docs/images/cdy7uua7fh8z/yobXanutPRCO3FWek8cOk/bc29e39fb8593cff35e2738234bfe6fe/twilio-vault-settings.png?fit=max&auto=format&n=PzoOIgRpU65TZp7z&q=85&s=dfbed0093a9c7e9d271fb66db12264fd" alt="Dashboard > Forms > Vault > Paramètres de connexion Twilio" data-og-width="1369" width="1369" data-og-height="491" height="491" data-path="docs/images/cdy7uua7fh8z/yobXanutPRCO3FWek8cOk/bc29e39fb8593cff35e2738234bfe6fe/twilio-vault-settings.png" data-optimize="true" data-opv="3" srcset="https://mintcdn.com/docs-staging-chore-gt-workflow/PzoOIgRpU65TZp7z/docs/images/cdy7uua7fh8z/yobXanutPRCO3FWek8cOk/bc29e39fb8593cff35e2738234bfe6fe/twilio-vault-settings.png?w=280&fit=max&auto=format&n=PzoOIgRpU65TZp7z&q=85&s=40bf3df7a8bacd104dc2035d99a21069 280w, https://mintcdn.com/docs-staging-chore-gt-workflow/PzoOIgRpU65TZp7z/docs/images/cdy7uua7fh8z/yobXanutPRCO3FWek8cOk/bc29e39fb8593cff35e2738234bfe6fe/twilio-vault-settings.png?w=560&fit=max&auto=format&n=PzoOIgRpU65TZp7z&q=85&s=3f556e855621ae4d89a5e6771070d811 560w, https://mintcdn.com/docs-staging-chore-gt-workflow/PzoOIgRpU65TZp7z/docs/images/cdy7uua7fh8z/yobXanutPRCO3FWek8cOk/bc29e39fb8593cff35e2738234bfe6fe/twilio-vault-settings.png?w=840&fit=max&auto=format&n=PzoOIgRpU65TZp7z&q=85&s=a983af680c8d2e9a6356cc58b46b6e8f 840w, https://mintcdn.com/docs-staging-chore-gt-workflow/PzoOIgRpU65TZp7z/docs/images/cdy7uua7fh8z/yobXanutPRCO3FWek8cOk/bc29e39fb8593cff35e2738234bfe6fe/twilio-vault-settings.png?w=1100&fit=max&auto=format&n=PzoOIgRpU65TZp7z&q=85&s=774d2ed15b16610eb78a4b89687bad3b 1100w, https://mintcdn.com/docs-staging-chore-gt-workflow/PzoOIgRpU65TZp7z/docs/images/cdy7uua7fh8z/yobXanutPRCO3FWek8cOk/bc29e39fb8593cff35e2738234bfe6fe/twilio-vault-settings.png?w=1650&fit=max&auto=format&n=PzoOIgRpU65TZp7z&q=85&s=e15ba102e92d95e6fca1292f496f332d 1650w, https://mintcdn.com/docs-staging-chore-gt-workflow/PzoOIgRpU65TZp7z/docs/images/cdy7uua7fh8z/yobXanutPRCO3FWek8cOk/bc29e39fb8593cff35e2738234bfe6fe/twilio-vault-settings.png?w=2500&fit=max&auto=format&n=PzoOIgRpU65TZp7z&q=85&s=810015b5560ef21cb3d44018f18971d0 2500w" />
   </Frame>
6. Sélectionnez **Add Vault Connection.**
